
A water bill that climbs. A faint musty smell in one room. A stain that keeps growing on the ceiling. These are the early hints of a hidden leak, and the longer it runs, the more damage it can do. The good news is that you can learn how to find a hidden water leak with a few simple checks, and most need no special tools at all.
A hidden leak is water escaping where you cannot see it. It may sit behind drywall, under a floor, above a ceiling, or in the line from the street to your house, and it often stays out of sight for weeks. This guide follows the same order a plumber uses: confirm the leak, narrow down the area, then check the likely spots one by one.
What Counts as a Hidden Water Leak?
A hidden leak is any leak you cannot see directly. It is different from a dripping faucet or a puddle under the sink, which you can point to. A hidden leak hides inside the structure of the house, so the first sign is often damage, a smell, or a bill.
Most hidden leaks fall into two groups. A supply line leak comes from a pressurized pipe that carries fresh water to fixtures. Even a pinhole in a copper pipe can release a steady stream day and night. A drain line leak comes from a pipe that carries waste water away. It may only leak when a fixture drains, so it can be harder to catch, and it often brings odor with it.
Common causes include corrosion in older metal pipes, a joint that loosened over time, a nail or screw that nicked a pipe during past work, and freeze damage that only showed up when the weather warmed. Flexible PEX pipe resists freezing better than rigid pipe, but its fittings can still leak. A slow leak can soak insulation, drywall, and the subfloor for weeks before anything shows.
Hidden Water Leak Signs to Watch For
Before you test anything, look at what your home is already telling you. Hidden water leak signs rarely arrive one at a time. They tend to cluster in one area, and the pattern points toward the source.
Signs on Your Water Bill and Your Fixtures
A water bill suddenly high with no change in household water use is one of the strongest early signs. Compare it with the same month last year. If the number jumped and nothing changed at home, water may be leaving the system somewhere you cannot see. Check your fixtures next. A shower that suddenly feels weaker, a faucet that sputters, or a toilet that refills on its own can all point to water escaping before it reaches the tap. Low pressure in one fixture usually means a problem at that fixture. Low pressure across the house can mean a leak in a main line.
Signs You Can See, Hear, and Smell
Walk through the house slowly and use all your senses. A ceiling water stain that grows, paint that bubbles or peels, baseboards that warp, or drywall that feels soft when you press it are all signs that water is sitting behind a surface. A musty smell leak in one room or closet, even when the room looks dry, is another strong clue. Listen at night when the house is quiet: a faint hiss, a drip, or the sound of running water when every fixture is off means water is moving somewhere. A warm spot on floor tiles or hardwood can point to a hot water line leaking under the floor, which is one of the classic slab leak signs. If several signs point to the same area, note it down. And if the signs look like a pipe that has already burst, read our guide to the warning signs of a burst pipe first.
Step 1: Run the Water Meter Leak Test
The water meter leak test is the most reliable way to confirm a hidden leak. It takes about two hours, needs no tools, and answers the first question: is water leaving your plumbing system? If you want to know how to find a hidden water leak, this test is where every search starts.
Turn off every tap and water-using appliance: faucets, showers, the dishwasher, the washing machine, the ice maker, and any irrigation system. Do not flush a toilet during the test.
Next, find your water meter, usually in a pit near the street or in the basement or utility room. In apartment buildings it may be in a shared utility area, so ask your building manager if you cannot find it. Write down the reading, or take a photo of the dial. Look for the leak indicator dial on the meter face, a small triangle or wheel that spins with even a tiny flow. If it is turning while everything is off, water is moving.
Now wait. EPA WaterSense advises checking your water meter before and after a two-hour period when no water is being used. If the meter changes at all, you probably have a leak. For a clearer result, run the test overnight. If the reading did not change, you probably do not have a pressurized supply leak. The problem may be a drain leak, which only flows when water drains, or condensation or a roof leak. According to EPA WaterSense, the average household’s leaks can account for more than 9,300 gallons of water wasted every year.
Step 2: Check Your Toilets with a Dye Test
Toilets cause more silent water loss than any other fixture. A worn toilet flapper lets water trickle from the tank into the bowl all day, and because the water runs down the bowl wall, you rarely hear it and never see a puddle. The toilet dye test finds this kind of leak in ten minutes.
Lift the tank lid. If the water level is low, or if you hear the fill valve cycling on by itself, that is a hint. A tank that refills on its own is often called a phantom flush, and it usually means the flapper is not sealing.
Put a few drops of food coloring in the tank, not in the bowl. Wait ten minutes without flushing. EPA WaterSense gives the same guidance: if any color shows up in the bowl after ten minutes, you have a leak. Flush right after the test so the color does not stain the tank. If the color appears, the problem is usually the toilet flapper or the fill valve. A flapper leak is one of the easiest fixes in home plumbing, but if the tank keeps refilling after you replace the flapper, call a plumber.
Check every toilet in the house, not just the one you suspect, and check around the base of each toilet. If the floor feels soft, or if you see staining on the ceiling below a bathroom, the wax ring under the toilet may be failing. A wax ring leak involves waste water rather than fresh supply water, so it may not show on the meter test, but it can rot the subfloor under the toilet.
Step 3: Narrow It Down with Your Shutoff Valves
Once the meter test confirms a leak, narrow down where it is. Shutoff valves let you divide the house into zones, and each test answers one question at a time.
Start with the main water shutoff, usually where the water line enters the house, often in the basement or a utility closet. Close the main shutoff valve, then check the meter again. If the meter stops moving, the leak is inside the house plumbing. If it keeps moving, the leak is in the buried service line between the meter and the house, or in an irrigation line that branches off before the house shutoff.
If the leak is inside, use the branch shutoff valve for one fixture or area at a time. Most homes have a shutoff valve at each toilet, under each sink, and at the washing machine. Close one, watch the meter, then open it and move to the next. When the meter stops moving after you close a particular valve, you have found the zone.
You can narrow it further with the water heater. Close the cold water inlet valve on the water heater and run the meter test again. If the meter stops, the leak is likely on the hot water side, which often points to a line inside a wall or under the slab. If the meter keeps moving, the leak is on the cold side. In apartment buildings, valves are sometimes shared or poorly labeled, so the pattern of symptoms matters more: a stain under an upstairs bathroom often points to a tub drain, a shower pan, or a toilet seal.
Need help finding a leak you cannot see? Burst Pipe Repair Inwood provides pipe leak detection for homes in Inwood, Upper Manhattan. If your meter test confirms a leak but the source stays hidden, call (585) 123-4567 for a free estimate.
Step 4: Search Room by Room
With the zone narrowed down, walk the house room by room with a flashlight. A careful look now saves you from opening a wall in the wrong place.
Start in the kitchen and bathrooms. Open the cabinet under each sink and run your hand along the supply line connections, the shutoff valves, and the P-trap under the sink. Feel for moisture, look for green or white crust on fittings, and check whether the cabinet floor is swollen or stained.
Check the appliances next. Feel the full length of the washing machine hoses. Rubber hoses older than a few years can bulge, crack, or leak at the connections. Feel the ice maker line behind the refrigerator and the dishwasher hoses. These connection points fail more often than the pipes themselves.
Look at the water heater: check the cold inlet, the hot outlet, the drain valve, and the pressure relief valve discharge pipe for drips, puddles, or rust stains. A small drip at the pressure relief valve can travel along a pipe and make it look like the leak is coming from somewhere else.
Check the less obvious spots too. Look at outdoor spigots for drips and for water pooling near the foundation, and look along the top of the basement foundation wall where pipes pass through. If you have an irrigation system, shut off its supply and repeat the meter test. If you find a drip, note exactly where it is. If the meter still moves, keep going, because a house can have more than one leak.
Step 5: Check Walls, Ceilings, and Floors Without Opening Anything
When the leak is not at a fixture, it is probably inside a wall, a ceiling, or a floor. Gather clues first, and do not cut anything open to look. A hidden leak behind wall framing can be found with patience and the right checks.
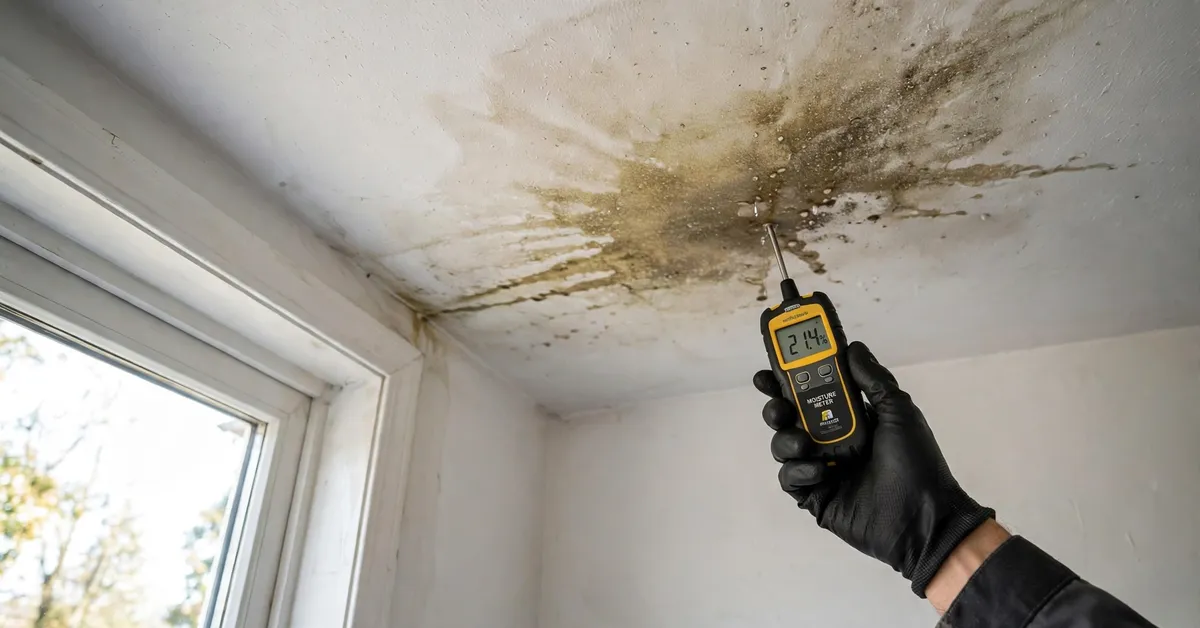
Start with your hands and eyes. Touch the wall or ceiling near the stain. Is it cool, soft, or swollen? Look for nail pops, blistered paint, or a yellow-brown stain that keeps growing. A ceiling water stain below a bathroom does not always mean the supply line is leaking. It can also come from a shower door leak, failed caulking, or cracked grout. The stain tells you where the water finished, not where it started.
Check what sits on the other side of that wall or directly above that ceiling. If a bathroom sits above, the source is often a drain, a shower pan, or a toilet seal.
A moisture meter helps here. Hold it against the wall or ceiling and compare readings across the same surface. A reading that is much higher in one spot points toward the source. Take readings in a grid so you can see the damp area take shape. The wettest reading is usually closest to the leak, but water can travel along framing and joists, so treat the pattern as a guide, not a guarantee.
For floors, watch for the classic slab leak signs: a warm spot on floor tiles or hardwood, a floor that feels soft underfoot, or cracks in flooring with moisture nearby. These can point to a hot water line leaking under a slab foundation, but pinpointing the exact spot under concrete needs professional tools.
How Plumbers Pinpoint a Leak You Cannot See
When your checks confirm a leak but the source stays hidden, a plumber uses tools that see and hear what you cannot, to find the leak with the least damage to the house.
Acoustic leak detection uses a sensitive listening device pressed against a wall or floor. Pressurized water escaping from a pipe makes a distinct sound, and the acoustic listening device picks it up through the surface. By comparing the sound at different points, a plumber can narrow the leak to a small area before anyone opens a wall.
Thermal imaging leak detection uses a thermal imaging camera to show temperature differences on a surface. A hot water leak warms the wall or floor above it, and a cold water leak cools it. The camera shows those differences as color patterns, which often trace the pipe and the damp area.
A moisture meter maps how far the dampness has spread, and a pressure test can confirm which section of pipe is losing water. Together, these tools let a plumber mark the leak location so the repair opens one small area instead of a large section of wall or floor. If you want that kind of search done for your home, our pipe leak detection service is built for exactly this work.
When to Stop and Call a Plumber
Most checks in this guide are safe for any homeowner. But there is a clear line between searching for a leak and repairing one, and crossing it can turn a plumbing problem into a much larger one.
Stop and call a plumber if any of these apply:
- The meter is moving fast and you cannot find the source.
- You see a ceiling sagging, or water spreading across a ceiling.
- Water is near electrical fixtures, outlets, or a breaker panel. Keep clear of wet sockets.
- You can see mold spreading across a wall or ceiling.
- Your water bill jumped sharply in a single month.
- The leak is under a slab foundation or inside a wall you would need to cut open.
- You already closed the main shutoff valve and water is still appearing somewhere.
Never cut into drywall, break concrete, or open a pressurized pipe to look for a leak. Opening a wall without knowing where the leak is usually means opening the wrong wall, and a pressurized supply line can release a large amount of water in seconds. If the hidden leak becomes a visible burst, read our guide on what to do when a pipe bursts and call for help.
Leaks that reach walls, floors, and ceilings also bring a second job: drying. Wet drywall, insulation, and subflooring need to dry fully, or mold and rot can follow. Our water damage restoration page explains how drying and repair fit together after the pipe is fixed.
Mistakes That Waste Time When You Search for a Leak
A few common mistakes make the search longer and more expensive than it needs to be. First, do not assume the wettest spot is the leak source. Water follows framing, pipe runs, and low points before it shows itself, so the stain may sit several feet from the actual break.
Second, do not focus only on fresh water lines. Drain leaks, shower leaks, roof leaks, and condensation can all mimic plumbing failure. If the meter test is negative but you still have stains or odor, look at other sources.
Third, do not leave a suspected leak for one more week if the evidence is getting stronger. A slow leak damages flooring, drywall, cabinets, and framing long before the pipe itself becomes the expensive part. The EPA WaterSense page notes that a faucet dripping once per second can waste more than 3,000 gallons of water in a year. A hidden leak behind a wall can waste far more. Do not remove tiles or cut into walls on a guess.
Frequently Asked Questions
How do I know if I have a hidden water leak in my house?
Turn off all water use and watch the water meter for two hours. If the reading changes, or the leak indicator dial moves, water is escaping somewhere. Other signs are a higher water bill, running water sounds, damp spots, stains, and musty smells.
Can a water leak hide inside a wall with no visible signs?
Yes. A slow leak in a supply line can soak insulation and the wall cavity for weeks before paint bubbles or a stain shows. A meter test tells you a leak exists even when nothing shows.
How do I find a leak without breaking walls?
Narrow it down first with the meter test, fixture checks, and closing shutoff valves one at a time. A plumber can then use a moisture meter, a thermal imaging camera, and acoustic listening to mark the spot.
What should I do first if my water bill suddenly jumps?
Run the water meter leak test: turn off all water use, note the reading, wait two hours, and check again. If the reading changed, start with the toilet dye test, and call a plumber if you cannot find the source.
Is a warm spot on the floor a sign of a leak?
It can be. A warm spot on tile or hardwood often points to a hot water line leaking under a slab foundation. A cold damp spot can point to a cold water line or a drain leak. Confirm it with the meter test.
How long does it take to find a hidden water leak?
The meter test takes about two hours, and the toilet dye test takes about ten minutes per toilet. A room-by-room search can take another hour. If the leak is behind a wall or under a slab, professional detection usually takes a single visit.
Should I call a plumber if I cannot find the leak?
Yes, if the meter test confirms a leak and your checks cannot locate it. A plumber can pinpoint the source without opening walls at random. Call sooner for a sagging ceiling, water near electrics, spreading mold, or a fast-moving meter.
Conclusion
Learning how to find a hidden water leak comes down to a steady order: confirm it at the meter, narrow it down with your shutoff valves, then search room by room. The meter test tells you whether a leak exists, the dye test rules out the most common silent culprit, and the shutoff valves tell you whether the leak is inside or outside, and on the hot side or the cold side.
Stop before the search turns into demolition. If the leak is behind a wall, under a slab, or anywhere you would need to cut to reach, professional detection saves time, money, and damage. A careful search now protects your home from the slow damage that a hidden leak does best: the kind you do not see until it is expensive.
Still cannot find the leak? Burst Pipe Repair Inwood can pinpoint it for you. Our pipe leak detection service finds hidden leaks without tearing your home apart, and every visit starts with a free estimate. Call (585) 123-4567 any time, day or night. We serve homes in Inwood, Upper Manhattan.